

For many years the most common way to clean and adjust the NES 72 pin connector was manually bending the pins back to position. This method is still very useful and valid in certain situations. You can view my older article here. which also describes how to disassemble the NES and remove the connector.

Skip ahead a few years and I decided to try the boiling process again. It worked beautifully! To my surprise the boiling process offers more than cleaning and breaking loose dirt & oil from the metal. The heat relaxes the metal and allows it to more closely assume its original shape.

Manually bending the pins may be needed after boiling, so far I have encountered that.
How to Boil:
(I am not responsible if you break yourself, the kitchen or the 72pin)
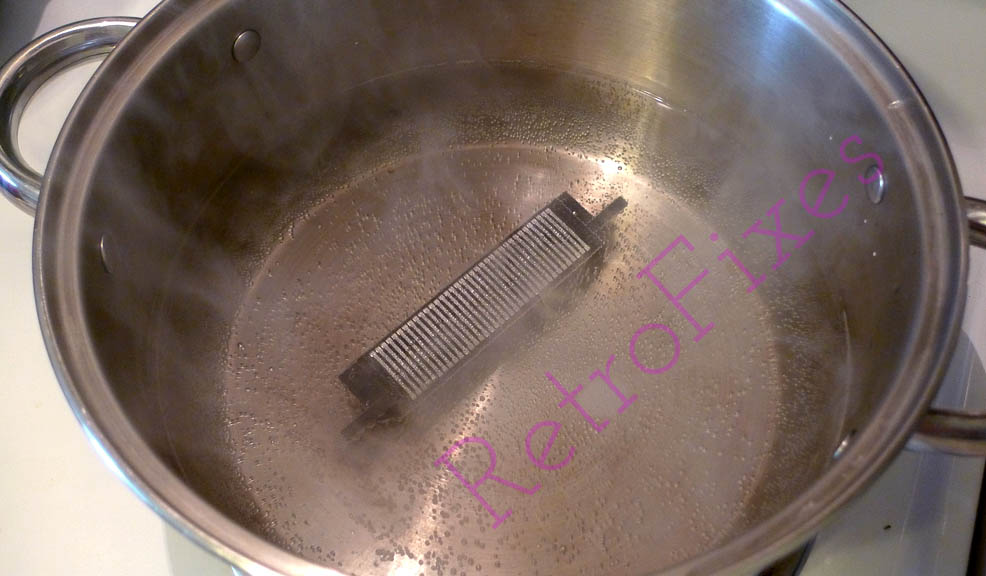
- Place the connector in clean preferably stainless steel pot. I would suggest using a pot that is not used for cooking. It is a good practice to keep mad scientist projects and food separate.
- Add enough water to fully submerge the connector. I suggest placing it front side down, the force of boiling bubbles will be directed inside the pins. Don't worry, the plastic will not melt.
- Turn the burner on high heat and bring to a rolling boil. Let the connector boil for 30mins.
- Allow to cool, rinse and fully dry before installing. A hair dryer can speed up the drying process.
I hope this article was helpful to my readers. If you have any questions, comments or want to share your experiences with cleaning these 72pins please share below.


I never tried this either up until this morning, never had to do it as I never had a pin so bad. I did as of a NES I bought yesterday, and in this case I did it a little different with a 5min dip, then you run a NES cart into the slot like 20x to scrape the loosened funk away, then another 5min dip again. It still came back with funk so I did a 3rd dip (most people say 2 work) and well it works. The only oddity is that now games work not being locked down, and if locked they don't. But if you just slide it in, it works 100%. I did the pin bending before doing the process too as I tried that first along with alcohol (91%) with the nes cleaning kit first which failed.
ReplyDeleteThanks for the tips. I have tried this with 20 connectors so far. All have worked perfectly after a 20min boil. Thanks for the tips I will try it.
Deletebending the pins first is why your games are tight now, if you have any tengen games just put one in and push it down for a couple days. it should be back to normal after that.
DeleteDoes this work on 3rd party connectors also?
ReplyDeleteI wouldn't advise you do this, since they are made of cheap material.
DeleteI boiled mine and disabled the lockout chip, i got this thing an it was well looking like it had a foot in the grave now it looks almost new minus the broken/missing door
ReplyDeleteThe upper pins on the 72 pin connector that I am working on now, two of them are WAY too bent, they spike up too much, they have been driving me crazy. So I am currently trying the boiling method, and I'll see if it works, if it does, I'll reply. Hopefully the boiling will make the pins pliable enough to bend, even though they are in contact with the edges of the connector.
ReplyDeleteP.S. Nintendo seriously should have put screws or something on the connector to make it possible to take it apart and put it back together, I mean seriously :P
Turns out, the boiling method super cleaned the connector, as I expected. It didn't really change the pliability of the connector, but I was able to push down on the two, and pull them out using a method discovered from: https://www.youtube.com/watch?v=nN05UzKKHuw
DeleteOverall very helpful, thanks :D
Or you can just install a Blinking Light Win kit and be done with it forever. With the boil method, sooner or later, those pins will eventually get bent out of shape again. It's a design flaw that BLW circumvents.
ReplyDeleteJust did this with 4 72 pin connectors and worked great. Last time I did it I think I didn't boil it long enough. 30 mins was much better.
ReplyDeleteJust tried this myself, and I'm stunned how well something so simple could work. I've seen 20 and 30 minutes claimed for the boil time, so I did mine at 25 minutes. I immediately noticed a tighter feel when pushing in cartridges and they boot up on the first try.
ReplyDelete